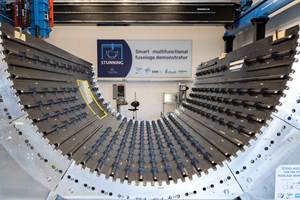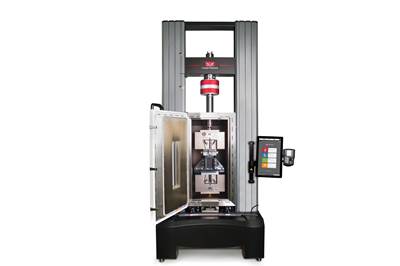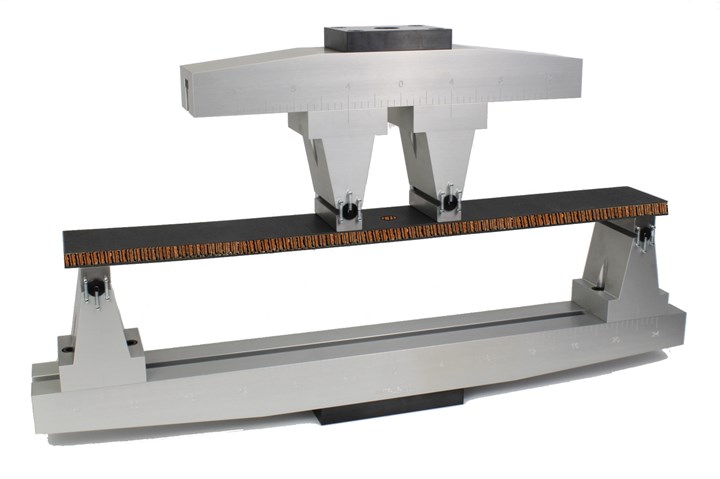
Fig. 1. ASTM D8453 sandwich open-hole flexure test fixture and specimen. Photo credit, all images: Dan Adams
In my January 2023 column, I discussed a new ASTM test method for use in assessing the notch sensitivity of sandwich composites: the sandwich open-hole compression (OHC) test, ASTM D84541. A second notch sensitivity test method for sandwich composites was also recently standardized: the sandwich open-hole flexure (OHF) test, ASTM D84532. In this column, I’ll provide an overview of this second sandwich notch sensitivity test method and draw some comparisons with other existing notch sensitivity test methods for composites.
Perhaps the first question to address is why it’s necessary to have two notch sensitivity tests for sandwich composites. For starters, it’s worth noting that there are two open-hole test methods for composite laminates: one for tension loading, ASTM D57663, and a second for compression loading, ASTM D64844.
A primary reason for having two notch sensitivity test methods for composite laminates is the difference in failure modes and resulting notch sensitivities under tension and compression loading. Sandwich composites are commonly subjected to flexural loading, resulting in a tension-loaded facesheet and a compression-loaded facesheet. When using fiber-reinforced composite facesheets, the compression-loaded facesheet typically fails first.
Additionally, sandwich composites are used in compression-loading applications, and their notched strengths under compression and flexural loading are typically not the same. Therefore, even though failure primarily occurs in compression-loaded facesheets, two separate test methods are desired.
The new sandwich OHF test standard is designated as an ASTM standard practice, as it provides only supplemental instructions for modifying the sandwich long beam flexure test method, ASTM D72495, for use with open-hole sandwich specimens. As in all other ASTM notch sensitivity tests for composite laminates and sandwich composites, a specimen width-to-hole diameter ratio of 6:1 is used. This ratio has been widely accepted in the aerospace composites community for producing acceptable notched strength reductions while minimizing the interaction between the centrally located open through-hole and the specimen edges.
As in the case of the sandwich OHC test specimen, a 12-millimeter-diameter through-hole is used, resulting in a 72-millimeter specimen width. Interestingly, this specimen width differs slightly from the 75-millimeter width specified in the sandwich long beam flexure test method, on which it is based. The reason? Using a 75-millimeter specimen width and maintaining a width-to-diameter ratio of 6:1 would require a 12.5-millimeter-diameter through-hole, for which cutting tools are not readily available. Note, however, that when performing the test according to U.S. customary units, a 0.5-inch-diameter hole is machined into a 3.0-inch-wide specimen, the same width as specified in the sandwich long beam flexure test method. Both the sandwich OHC and OHF test specimens have the same 12-millimeter hole diameter and 72-millimeter specimen width, as the two test methods were developed in a coordinated effort.
The choice of notch sensitivity test should be based on the primary type of loading in the intended application.
The four-point flexural loading configuration used for the sandwich OHF test produces a uniform bending moment and zero shear force across the notched inner span while minimizing the shear forces in the outer spans. The same 560-millimeter outer support span and 100-millimeter inner loading span that are designated as the standard configuration for unnotched sandwich flexure testing in ASTM D7249 are also used for sandwich OHF testing. A total specimen length of 600 millimeters allows for a 20-millimeter specimen extension beyond the outer supports.
Prior to standardization, both testing and finite element analyses were performed to investigate the effect of the inner load span length on the open-hole flexure strength. The 100-millimeter inner loading span length was determined to be sufficient to minimize interactions between the open-hole stress concentration and the inner loading heads6.
The long beam flexure test fixture (Fig. 1) loads the sandwich specimen using pivoting, 25-millimeter-wide flat loading blocks. Additionally, rubber pressure pads may be used between the loading blocks and specimen to prevent localized damage to the facesheets. Because of the dominating presence of the 12-millimeter through-hole in the center of the specimen, test results are relatively insensitive to parameters of concern in the unnotched sandwich flexure test, such as failure at the loading points and rough or uneven specimen edges. However, because the notch has a dominant effect on the sandwich specimen strength, consistent preparation of the hole, without damage to the sandwich specimen, is required for obtaining meaningful results.
Note that the only acceptable failures are those that occur at the hole in one or both of the facesheets. As with all other composite notch sensitivity tests, the open-hole strength, referred to in the standard as the facing ultimate stress, is calculated using the total width of the specimen, disregarding the reduced area produced by the hole.
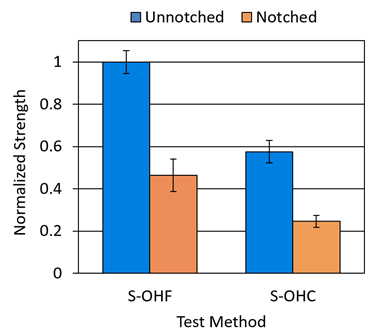
Fig. 2. Unnotched and notched strengths from sandwich open-hole flexure (OHF) and sandwich open-hole compression (OHC) testing.
Having introduced the two new standardized test methods for notched testing of sandwich composites, I’ll now revisit my earlier question regarding the need for two notch sensitivity tests for sandwich composites. While developing these test methods, considerable testing and analysis was performed for each of the sandwich test methods. The primary sandwich configuration used in these investigations consisted of Hexcel (Stamford, Conn., U.S.) IM7/8552 carbon/epoxy cross-ply facesheets bonded to a 12-millimeter-thick, 64 kg/m3 Hexcel Nomex honeycomb core6. Notched and unnotched specimens were tested to determine the notched strength ratio for the sandwich OHF and OHC test methods. Three replicates were tested for each condition and results were normalized to the average strength of the unnotched sandwich flexure specimens as shown in Fig. 2. Note that the baseline unnotched strengths as well as the notched strengths differ significantly between the flexure-loaded and compression-loaded test methods, confirming the need for both sandwich notch sensitivity test methods and suggesting that the choice of notch sensitivity test should be based on the primary type of loading in the intended application.
Finally, note that for the sandwich configuration investigated, the notched strength ratio, defined as the notched strength divided by the unnotched strength, is similar for the two notched sandwich test methods: 0.46 for the sandwich OHF method and 0.43 for the sandwich OHC method. However, this observation is based on a single sandwich configuration, and further investigation is required to determine if similar notched strength ratios are produced with other materials and sandwich configurations.
References
1 ASTM D8454/D8454M-22, “Open-Hole Compressive Strength of Sandwich Constructions,” ASTM International (W. Conshohocken, PA, U.S.), 2022.
2 ASTM D8453/D8453M-22, “Open-Hole Flexural Strength of Sandwich Constructions,” ASTM International (W. Conshohocken, PA, U.S.), 2022.
3 ASTM D5766/D5766M-20, “Open-Hole Tensile Strength of Polymer Matrix Composite Laminates,” ASTM International (W. Conshohocken, PA, U.S.), 2018 (first issued in 1995).
4 ASTM D6484/D6484M-20, “Open-Hole Compressive Strength of Polymer Matrix Composite Laminates,” ASTM International (W. Conshohocken, PA, U.S.), 2020 (first issued in 1999).
5 ASTM D7249/D7249M-20, “Facesheet Properties of Sandwich Constructions by Long Beam Flexure,” ASTM International (W. Conshohocken, PA, U.S.), 2020 (first issued in 2006).
6 Stanfield, M.L., Kuramoto, B., and Adams, D.O., “Development and Evaluation of the Sandwich Open-Hole Flexure Test,” to appear in Journal of Sandwich Structures and Materials, 2023, doi: 10.1177/10996362231151453.
Related Content
CFRTP enables better, greener smartphones
Carbon Mobile’s “monocoque” design eliminates separate case, cover and frame, better protects electronics and simplifies disassembly.
Read MorePlant tour: National Institute for Aviation Research, Wichita, Kan., U.S.
NIAR, located at Wichita State University in the heart of the American aerospace manufacturing industry, has evolved to become a premier hub of teaching, R&D, creativity and innovation.
Read MoreThermoplastic composites welding: Process control, certification, crack arresters and surface prep
More widespread use of welded composite structures within a decade? Yes, but further developments are needed.
Read More3D-printed CFRP tools for serial production of composite landing flaps
GKN Aerospace Munich and CEAD develop printed tooling with short and continuous fiber that reduces cost and increases sustainability for composites production.
Read MoreRead Next
Determining the equivalency of composite test methods
While time consuming and somewhat subjective, the comparative assessment approach has been proven effective toward assessing composites test method equivalence.
Read MoreComposite testing challenges, Part 1: Introduction to mechanical testing of composites
A range of standardized mechanical tests for complex composites are available and still under development for materials development, design and quality control requirements.
Read MoreComposites end markets: Energy (2024)
Composites are used widely in oil/gas, wind and other renewable energy applications. Despite market challenges, growth potential and innovation for composites continue.
Read More




.jpg;maxWidth=300;quality=90)


