NDI and NDT methods for process control
There are three main nondestructive inspection technologies currently under development to help qualify surface preparation techniques for adhesively bonded aerospace surfaces evaluate the quality of both the prepared surfaces and the final bonded joint.
There are three main nondestructive inspection/nondestructive testing (NDI/NDT) technologies currently under development to help qualify surface preparation techniques and evaluate the quality of both the prepared surfaces and the final bonded joint:
Contact angle measurement uses a drop of liquid, usually water, to evaluate how well a surface has been prepared for bonding. A surface without sufficient energy activation for bonding tends to be hydrophobic, that is, it will cause the drop of water to bead up. An NDI device is used to measure the angle of the bead edge, resulting in a large angle measurement. A contact angle measurement of 0˚ represents a perfectly hydrophilic surface — one on which the water does not bead up but instead flows out and coats the entire surface. This indicates maximum wettability of, and optimum adhesion between, the bonded surface and adhesive. The greater the bead angle, the greater the likelihood that adhesion could be impaired.
Brighton Technologies Group’s (BTG, Cincinnati, Ohio) Surface Analyst tool started with technology developed more than 10 years ago in the U.S. Department of Defense (DoD)-funded CAI program, aimed at improving the reproducibility of bonding subassemblies and fasteners using composites.
“When mechanics sand and solvent wipe, the results can vary widely,” explains BTG president and chief scientist Giles Dillingham. “The industry needed a tool to use on the production floor that would ensure surface preparation was completed properly from day to day and operator to operator.” The Surface Analyst is currently used in the F-35 fighter jet program with composite and metal bonding, and also in the automotive industry for troubleshooting paint-to-plastic adhesion.
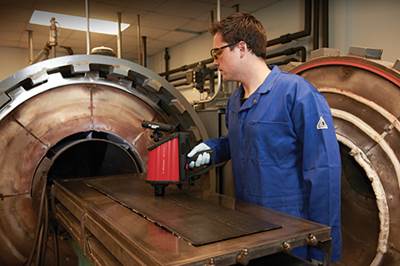
The Surface Analyst uses a ballistic method to deposit a 2μL water drop for accurate, repeatable results in 3 seconds. An immediate ‘go’ or ‘no-go’ for bonding is enabled by inputting the allowable range of angles, determined by measuring the same surface prepared to specification vs. unprepared or poorly prepared.
The handheld instrument is lightweight, portable, and enables interrogation of vertical, contoured or inverted surfaces that may be difficult to inspect by other methods. Data is logged for statistical process control and can be downloaded to a PC via the USB port.
But Kay Blohowiak, technical fellow working in Composite Bonding Processes for Boeing Research & Technology (Seattle, Wash.), points out, “This is still a discrete measurement method. There are no techniques yet to measure 100 percent of the bondline. So a sampling methodology has to be defined in order to demonstrate reliability in the full bonded joint.” Dillingham suggests that, in general, more measurements — typically one every few inches — should be made near the edges of the bonding area, where it is more common to have missed areas and contaminants dragged in from the edges.
Fourier Transform Infrared (FTIR) Spectroscopy as applied by Agilent Technologies’ (Santa Clara, Calif.) 4100 ExoScan Surface FTIR instrument, passes infrared (IR) radiation through a composite surface and onto a detector that precisely measures the amount of IR absorbed. This absorbance is a unique spectral fingerprint used to identify the molecular structure of the surface and determine the amount of a particular compound or contaminant — for example siloxane, a common release agent used in peel ply.
John Seelenbinder, Agilent Technologies senior applications and product manager details, “We have directly measured siloxane contamination for carbon composite surfaces down to less than 1 μg/cm2.” This is slightly higher than the threshold for bonding, but Seelenbinder says finer resolution may be possible by refining the detection algorithms. The instrument is a handheld tool that provides analysis without damaging the sample.
FTIR also can evaluate methods for increasing surface energy activation, such as laser and plasma treatment. “These add functional groups — chemical bonds like -OH or oxidation — to the surface, which we can detect and quantify,” says Selenbinder. “You could obtain a pass/fail readout, depending upon the thresholds you set.”
First, a calibration for the specific type of part would be developed, collating measurements of acceptable and poor levels of surface preparation, contaminants and pretreatments. Software guides the user to check background light and then helps the user align the instrument correctly to the sample surface prior to pulling the trigger. Data is collected within 20 seconds, showing the amount of contaminant or functional groups in μg/cm2 and indicates ‘go’ or ‘no-go’ based on the calibration thresholds.
Seelenbinder adds, “You don’t have to interpret the signal, like with UT [ultrasonic NDT]. The software does that for you. You can save the data and then measure the next point.” He emphasizes, however, that these are point measurements. Here, too, sampling is necessary. “Typically, the procedure is to measure every 6 to 12 inches along a bondline.”
Laser bond inspection (LBI) uses a pulsed laser beam to create a stress wave that can test the relative strength of a composite-to-composite bond’s adhesive interface. The stress wave strength can be selected by varying the energy and diameter of the laser pulses. Parts are prepared for inspection by applying a thin layer of light-absorbing material, such as tape or black paint. Then a thin layer of water is flowed on top. The laser beam passes through the water and is absorbed by the opaque overlay, creating a plasma (ionized gas with no overall electric charge). The water temporarily contains the plasma and intensifies the stress wave, directing it to travel into the material. The compressive stress wave is reflected off the back free surface as a tensile wave, which then travels back to the bondline, testing its strength (See illustrations in the article referenced in the endnote below). This interrogation will leave strong bonds unaffected, but will detect weak and kissing bonds (bondlines that appear to have intimate contact without mechanical strength).
LSP Technologies Inc. (LSPT, Dublin, Ohio) has developed a mobile LBI system with which inspection is done aided by an articulated robotic arm with a reach of 5.7 ft/1.7m. The laser beam used is in the IR spectrum, at 1,054 nanometers (nm), with a pulse emitted once every eight seconds (or 1/8 Hz). The inspection head contains a water delivery and collection system that is held tight to the surface by a vacuum, preventing laser light from escaping. At 5.3 ft wide by 6.5 ft high by 13 ft in length (1.6m by 2m by 4m), the mobile unit fits through standard double doors and is steerable. It can inspect bonded structures up to 1 inch/25.4 mm in thickness and stores data for later processing. LSPT is developing methods for thicker structures.
According to LSP’s VP of business development David Lahrman, “The system we have today was developed to cover a wide range of applications that require pulse energy ranging from 10 to 50 Joules. Our next goal is to create a more focused portable system applicable to inspect thinner bonded structures, using energies in the 10 to 20J range, which will reduce the system size.”
This article is a sidebar to a feature article titled "Certification of bonded composite primary structures." To read this article, click on its title under "Editor's Picks," at top right.
Related Content
VIDEO: Plasma surface treatment technology improves adhesion
Plasmatreat demonstrates its Openair-Plasma surface treatment technology, which can enhance material adhesion.
Read MoreIPSA acquires bonding adhesives based on MMA technology
IPS Adhesives (IPSA) introduces a line of adhesives using acrylate and MMA technology from L&L Products for the bonding of dissimilar materials such as metals and composites.
Read MoreUDRI opens RAAM lab to advance robotic femtosecond laser
RoboCLASP, an athermal ablation system initiated for preparing composites for bonded assembly, is being roboticized to advance U.S. Air Force needs.
Read MorePlasma moves beyond improved bonding to coatings, multifunctional composites
Plasmatreat cold plasma systems clean, activate surfaces and apply nanocoatings for dielectric barriers and more.
Read MoreRead Next
Certification of bonded composite primary structures
OEMs develop technology to quantify uncertainty in pursuit of the no-bolt bondline.
Read MoreCutting 100 pounds, certification time for the X-59 nose cone
Swift Engineering used HyperX software to remove 100 pounds from 38-foot graphite/epoxy cored nose cone for X-59 supersonic aircraft.
Read MoreCeramic matrix composites: Faster, cheaper, higher temperature
New players proliferate, increasing CMC materials and manufacturing capacity, novel processes and automation to meet demand for higher part volumes and performance.
Read More


